Getting started
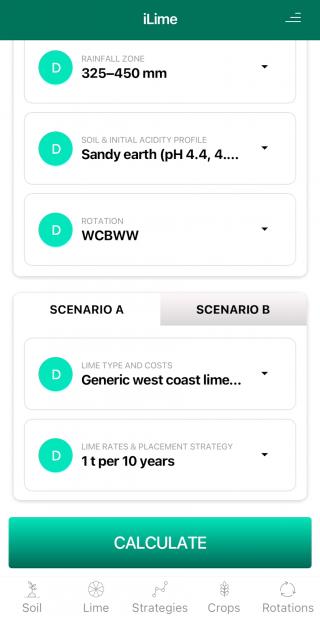
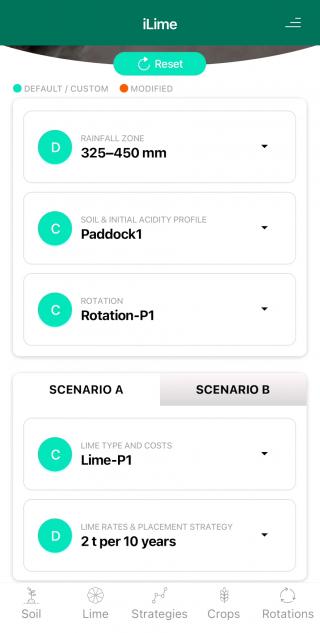
To get started with iLime, select the rainfall zone for the paddock and one of the default options for soil, rotation, lime source and strategy and then tap ‘Calculate’. The 'Calculate' button is below the box for selecting the lime source(s) and strategy(ies) for Scenario A and Scenario B. You may have to scroll to see it, depending on the device that you are using. Results for the two scenarios chosen, and for an unlimed soil, are displayed in graphs and tables on the Results Page (see below).
Note: Click on images to see full size
Results page
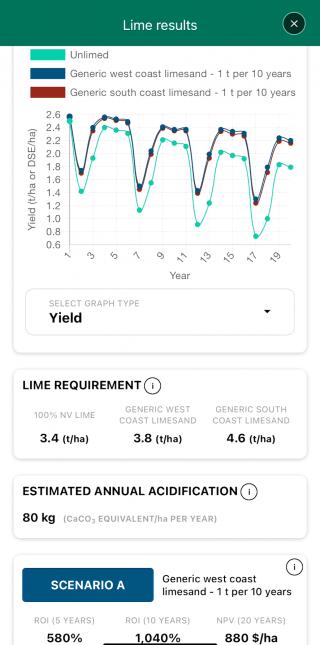
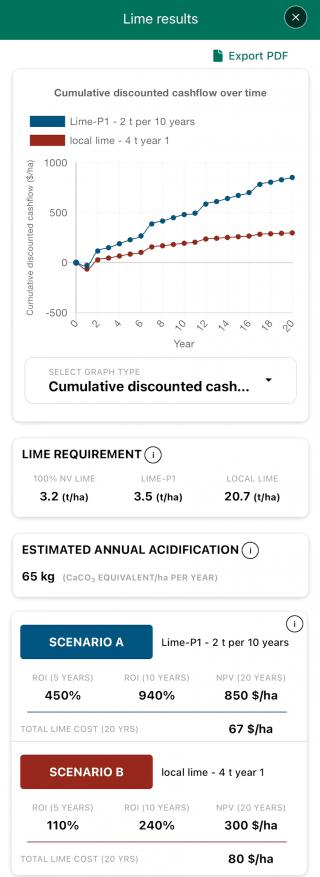
The output displayed on the graph may be changed by selecting from the drop-down menu immediately below it. Values corresponding to the points on the graph may be displayed by simply tapping a point on one of the lines.
A summary of the results is provided below the graph.
The estimated lime requirement is based on the bulk neutralising value (NV) of the product(s) used in Scenario A and Scenario B. The rate for a hypothetical 100% NV product is given for comparison. These values are intended as a guide to the possible lime requirement of each scenario over 20 years (see Lime Application to a Target pH). A more accurate result calculated in iLime is presented in the changes in yield and pH shown in the graphs.
The estimated annual acidification rate (as kilogram of lime equivalent per hectare per year) is provided for the rotation that has been used in the scenarios.
A snapshot of the results is provided for each scenario in the form of the return on investment (ROI) at 5 and 10 years and net present value (NPV) at 20 years. The total, discounted cost of lime over 20 years is shown for each scenario.
Export PDF or export Excel
Tap the ‘Export PDF’ button on the Results Page to create a report of your results in pdf format.
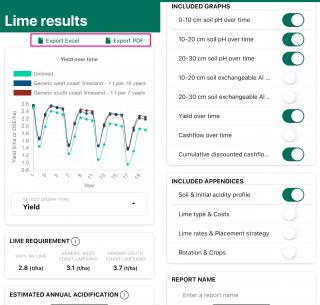
Use the radio buttons to select the output that you would like to include in the pdf report and then navigate to where on your device you would like to save the file—or select the app that you’d like to use to open the pdf report.
Tap the ‘Export Excel’ button on the Results Page to save an Excel file of your results (pH, yield and cumulative discounted cashflow).
Custom inputs
Customise iLime so that results are most relevant for your situation. Soil type, lime source, lime strategy, crop and/or rotation may all be customised.
Soil type
A soil type in iLime represents the soil in a paddock or area of a paddock.
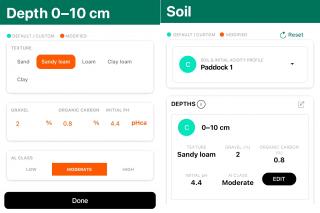
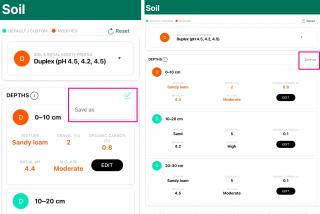
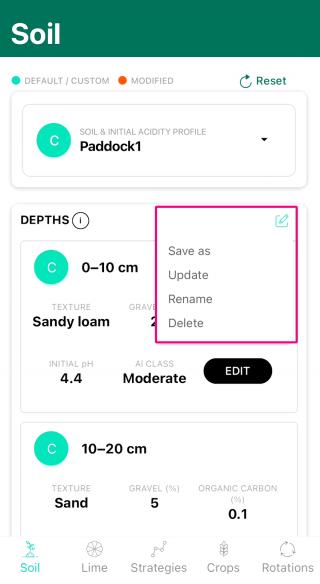
To create a custom soil, first select the default soil that best matches the soil that you wish to represent. For each depth, edit the values for pH, organic carbon (OC%), gravel %, texture and aluminium (Al) class to those for the paddock (or area of soil). The information box on the soil page provides guidelines for these inputs.
Soil pH is measured in CaCl2 (and provided in most soil tests). The percentages of organic carbon and gravel are those provided in a standard soil test. In iLime, soil texture is simplified to five categories (sand, sandy loam, loam, clay loam and clay). Select the category that best fits the soil layer. The Al class relates to the release of toxic aluminium at low pH. Three broad categories are used, as there is great variation in levels of toxic aluminium for given soil pH and texture. The 'high' category is representative of soil with low pH and high levels of Al, such as eastern wheatbelt wodjil sub-soil or acidic red sand (e.g. Perenjori). The 'moderate' category includes yellow ‘pear tree’ sand (e.g. Yuna or Chapman Valley) and loam soil. The 'low' category applies to pale, ‘gutless’ sand (e.g. Badgingarra and Esperance), soil with high organic matter (>2%) or clay soil.
Use 'Save as' to give the soil a relevant name. Edited values appear orange until they have been saved. A green circle and letter ‘C’ indicate a saved custom setting.
Lime source
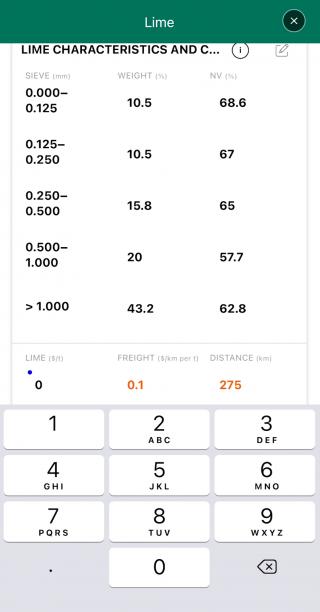
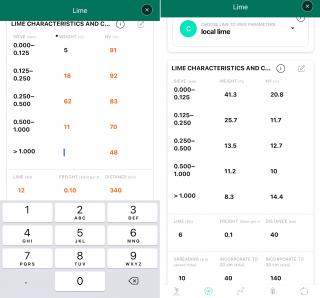
Each lime source is specified by the percentage weight and neutralising value (NV%) in each size fraction, cost of lime and freight, as well as the cost to spread and to incorporate. A total cost of lime per tonne on-farm may be entered as the lime cost in place of using the cost of lime and cost of freight.
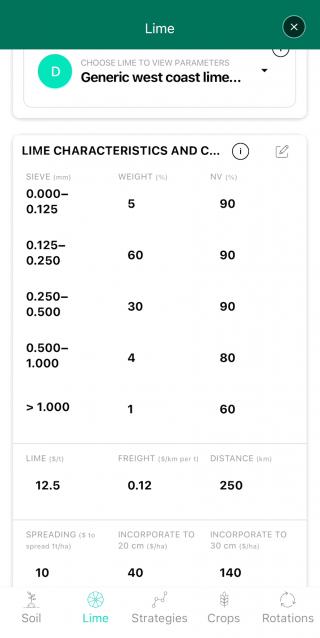
The cost of spreading lime is simply multiplied by the rate. So there is no automatic adjustment for efficiencies of spreading at higher rates. To represent this you should enter a reasonable average cost of spreading.
An assessment of lime quality, from the annual audit sample, is provided in the app for lime suppliers who are members of Lime WA Inc. These values are updated each year to those of the most recent audit sample. You may wish to use these values, or to enter values from analyses that you have had done. The cost of lime, freight, spreading and incorporation needs to be added for lime from these suppliers, so that it represents your situation.
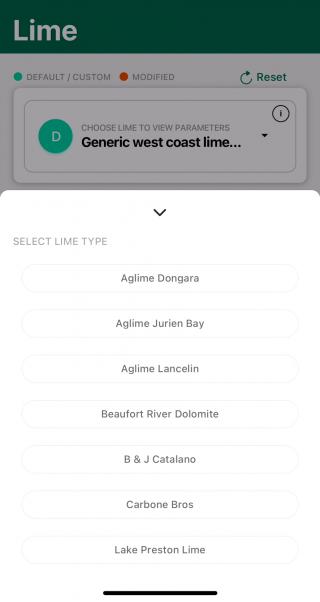
If you wish to edit the specifications of lime quality for a named lime supplier; are using lime from a supplier that is not a member of Lime WA Inc.; or lime from an on-farm source, you will need to enter the correct values for the % weight and NV% quality, as well as the cost of the lime. Select a lime (e.g. one of the generic sources provided in the app) and edit the values as shown in the image below.
Lime strategy
Strategies may be customised to include various combinations of the year of application, rate(s) and incorporation.
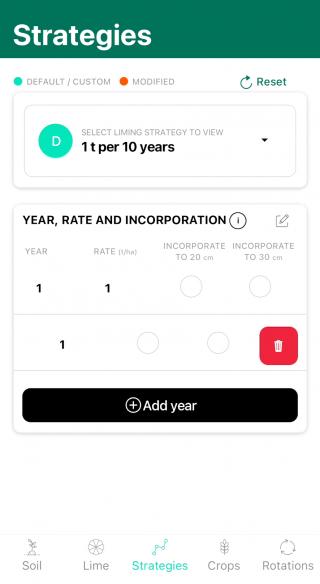
Incorporation may be to a depth of either 20cm or 30cm. The app apportions the lime in a 50:50 split into the surface and second layer of soil if incorporation to 20cm is selected and in a 25:50:25 split into the surface, second and third layer of soil if incorporation to 30cm is selected. If no incorporation is selected the lime is applied to the surface layer only (though it may move deeper in the profile in time).
Crop and rotation
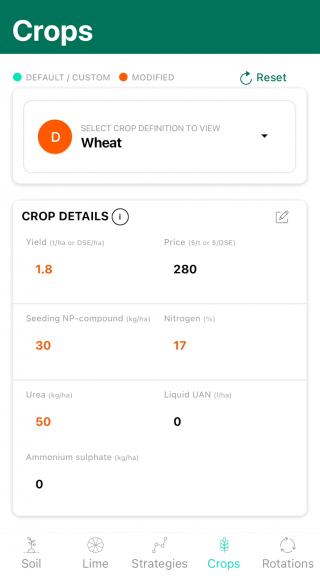
A crop is specified by the crop type, yield, farmgate price, and applications of nitrogen fertiliser. When customising a crop, select a default crop of the same type and then edit the settings to suit your situation. This ensures that the custom crop will have the correct tolerance to acidity.
It is important that the yield entered for the crop represents what would realistically be expected, on average, for that crop grown on the soil with its initial pH. If you wish to represent crops in good, average or poor seasons, simply save different versions with the yield and inputs adjusted accordingly.
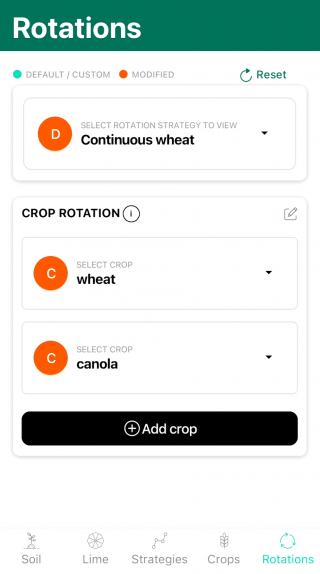
Crops need to be combined into a rotation to be used in a scenario. Any number of crops from 1 to 20 may be added to form a rotation. The crops selected to form a rotation will be used repeatedly in the app, in the same sequence, over the 20 years of the analysis.
Feedback from the App
The letters D and C are used to denote default and custom settings throughout the app. Orange is used to denote a value or setting that has been altered but not yet saved by the user. A green circle and black text are used for a setting that has been saved.
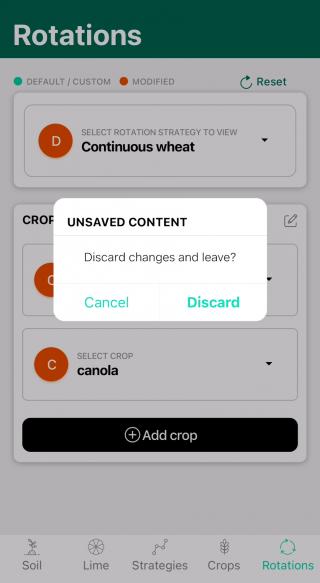
A warning appears if you try to navigate away from a page or screen before changes have been saved, checking whether they should be saved or discarded. The app will also give you a warning before you delete a setting.
Editing custom settings
A custom soil, lime, strategy, crop or rotation may be changed and updated, renamed or deleted. These options appear in the edit menu of a custom setting.
Using custom settings
Once your custom settings have been saved, they are available to use in iLime.
Select the rainfall zone for the paddock under consideration, then select your custom soil, rotation and combinations of lime and strategy for the two scenarios that you would like to examine. Tap ‘Calculate’ to view results.
Export/Import custom settings
Export data
Custom settings may be exported. This allows you to import some or all of your custom settings for use in later analyses, to save them onto a computer and/or to transfer them to other devices.
The ‘Export data’ option may be found in the ‘hamburger menu’ in the top right corner of the app screen.

Type a name for the file to be exported and tap the ‘Export Custom Content’ button. The file will be saved to the documents area on your device. Any and all customised content currently in the app will be saved.
Saving files to a computer
Once saved, your file(s) may be found in the files area on your device. These files may be copied to your computer to save as a back-up or to transfer to other devices. Files are transferred via normal file navigation for iOS or Android devices.
Import data
The ‘Import data’ option may be found in the ‘hamburger menu’ in the top right corner of the app screen.
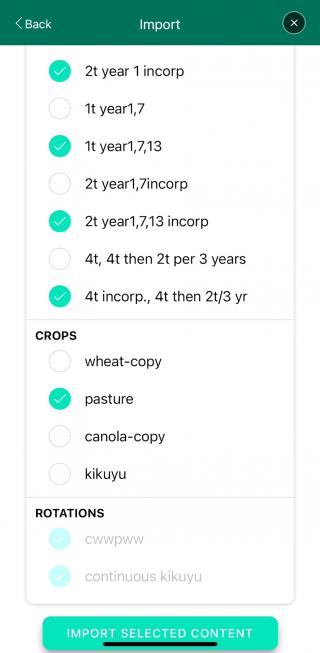
Tap ‘Choose file’ and navigate to the location on your device where you have saved your exported data files (.json). Select the file from which you would like to import custom content and the specific content that you would like to import. Tap ‘Import Selected Content’.
Rotations can only be imported if all of the crops in the rotation are also imported. If custom content is imported that has the same name as existing custom options in iLime, the content has ‘-copy’ added to the name.
The imported custom content will be available to use in scenarios in iLime.
Tip: We suggest that you export custom settings and save them to your computer prior to updating iLime to ensure that none of your saved data is lost.
Settings
The 'Settings' option allows you to alter the number of years for the analysis and the discount rate. Limits and suggested values for these are described in the information text for each setting.
Evaluating lime
Sources of lime may be assessed in iLime to determine the product that will give you the best return on investment, for your situation.
The information about soil, production and lime strategy that you have specified for the paddock (or area) of soil are used to estimate the return from liming, discounted over time. The graph of discounted cash flow indicates returns over time, including the estimated number of years until break-even for each scenario.
In addition, you can compare the estimated change in pH and yield from different lime sources and/or rates by selecting those graphs on the Results page.
The total, discounted lime cost provided with the summary information on the Results page allows you to compare two sources of lime in terms of total cost.
Assessing a lime mix
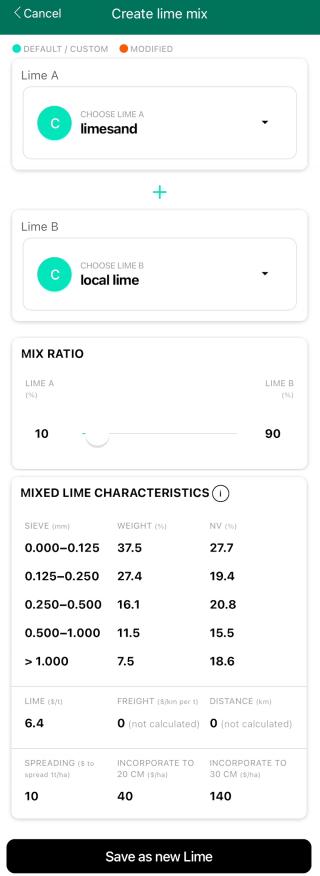
You may evaluate mixing lime sources using the 'Create lime mix' option located within the edit menu on the Lime page. Once on the lime mix page, select two lime sources that you would like to mix and adjust the proportion of the mix using the slider. The weight in each sieve size and neutralising value are adjusted automatically. (Note: iLime assumes that the two products are mixed completely in the proportions selected).
Save the new mix to create a lime that can be used in your scenarios. You will need to enter a cost and distance for any freight or, alternatively, simply adjust the lime cost, to reflect the cost of freight, once the lime has been saved.
A new lime source generated from a mix can be used or edited in exactly the same manner as any other custom lime. It is possible to use a lime mix as one of the lime sources in a later mix (should you be considering mixing more than two lime sources).
Lime application to a target pH
The estimated lime requirement calculated by the app and displayed in the summary on the Results page is based on the amount of lime required to adjust the pH of the soil to the minimum target pHCaCl2 values of 5.5 in the surface and 4.8 in subsurface soil.
The graph of the change in pH of the soil in each layer will enable you to examine the results for each scenario in more detail. You may then adjust the rates used in a scenario and calculate to see the impact relating to the specific targets for your soil.

